Step 1
Sign in to Google Search Console
Google Search Console is a free tool that shows you how your site appears in Google Search, which queries bring visitors, and any issues that might prevent indexing.
- Go to search.google.com/search-console
- Sign in with your Google account (Gmail or Google Workspace)
Step 2
Add your property
A "property" is Google's term for a website you want to track. You'll add elevaition.solutions as a URL prefix property.
- Click "Add Property" in the top-left dropdown
- Choose "Domain" (left panel)
- Enter your domain (e.g.
africansunholdings.com) - Click Continue
You'll see this screen — choose the left side:
Domain
- All URLs across all subdomains (m., www. ...)
- All URLs across https or http
- Requires DNS verification
Enter domain or subdomain
URL prefix
- Only URLs under entered address
- Only URLs under specified protocol
- Allows multiple verification methods
Enter URL
Why Domain? (Always)
Always choose Domain. Every website needs to track both http and https traffic — if someone visits the http version of your site, URL Prefix would miss it entirely. Domain verification captures everything: both protocols, all subdomains (www, app, blog), and any future subdomains you add. URL Prefix only tracks one specific URL pattern, leaving gaps in your data. The only trade-off is that Domain requires a DNS TXT record instead of a simple file upload — but that takes 2 minutes and gives you complete coverage.
Step 3
Verify ownership
Google needs to confirm you own the site. The easiest method with Cloudflare Pages is uploading an HTML verification file.
Google will show a "Verify domain ownership via DNS record" screen. You'll see something like this:
Verify domain ownership via DNS record
africansunholdings.com
The dropdown at Step 1 lets you choose your DNS provider. If your domain is on Cloudflare, Google offers an automatic one-click flow. If not, select "Any DNS provider" for manual setup.
Before You Click Start Verification
Make sure your browser allows pop-ups. Google opens a popup window to authorise access to your DNS provider. In Chrome: Settings → Privacy and security → Site settings → Pop-ups and redirects → set to "Sites can send pop-ups and use redirects". If a popup is blocked, you'll see a small icon in the address bar — click it to allow.
If your DNS is on Cloudflare (automatic)
- In the "Instructions for" dropdown, select Cloudflare.com
- Click Start Verification
- Google will ask you to authorise access to your Cloudflare DNS — sign in to Cloudflare when prompted and approve
- Google adds the TXT record automatically — wait for verification to complete before closing the tab
Easiest Method
This is the fastest way — Google handles everything. No need to manually copy values or add DNS records yourself. It typically completes within a minute.
If Cloudflare auto-verification fails, or your DNS is with another provider
Change the dropdown to "Any DNS provider". Google will show you a TXT record to add manually:
Verify domain ownership via DNS record
[yourdomain.com]
Important: Where to add the record
Add the TXT record where your domain's DNS is managed (e.g. Cloudflare), not where the domain was purchased (e.g. GoDaddy). If your nameservers point to Cloudflare, that's where Google will look for the verification record — even if you bought the domain elsewhere.
- Click COPY to copy the verification code Google provides
- Log in to where your DNS is managed (e.g. Cloudflare, not where the domain was purchased) and go to DNS settings for your domain
- Add a new record: Type: TXT / Name: @ / Content: paste the code you copied / TTL: Auto
- Save the record, then wait 2-5 minutes for DNS propagation
- Go back to Google Search Console and click Verify
Verification Failed?
If verification fails, wait 10 minutes and try again. DNS changes can take a few minutes to propagate globally. You can check if your TXT record is live by searching "DNS TXT lookup" online and entering your domain.
Once verified, you'll see this:
Verification method:
Domain name provider
To stay verified, don't remove the DNS record. To avoid losing verification, you may want to add multiple verification methods from the Settings > Ownership verification.
What about backup verification methods?
Google suggests adding multiple verification methods as a safety net. However, when you choose Domain verification (as recommended in this guide), the DNS TXT record is the only method available. Backup options like HTML tags or file uploads are only offered for URL prefix properties. This is perfectly fine — just remember to never delete the TXT record from your DNS provider. If it's accidentally removed during a DNS migration, provider switch, or routine cleanup, you'll need to re-add it to regain access to your Search Console data.
Step 4
Submit your sitemap
A sitemap tells Google about all the pages on your site and when they were last updated. Submitting it speeds up indexing and ensures no pages are missed.
Does your site have a sitemap?
Check by visiting https://[yourdomain.com]/sitemap.xml in your browser. If the page loads with XML content, you have one. If you get a 404 error, you need to create one first (see below).
If your site already has a sitemap
- In Search Console, click Sitemaps in the left sidebar (under Indexing)
- In the "Enter sitemap URL" field, enter the full URL to your sitemap, e.g.
https://www.[yourdomain.com]/sitemap.xml - Click Submit
Sitemaps
Add a new sitemap
What happens next
Google will fetch your sitemap and start processing the URLs listed in it. The status will show as "Success" once Google has read it. This can take a few minutes to a few hours.
Getting "Couldn't fetch"?
This is common on the first attempt, especially if your site uses Cloudflare or another CDN with bot protection. Try these fixes:
- Try both URL formats — if
https://www.[yourdomain.com]/sitemap.xmlfails, submithttps://[yourdomain.com]/sitemap.xmlas well (or vice versa). Often one will succeed even if the other doesn't. - Check your sitemap is accessible — open the sitemap URL in your own browser. If you can see the XML content, the file is fine and the issue is bot access.
- Check Cloudflare bot settings — go to Cloudflare → Security → Bot traffic. Make sure "Bot fight mode" is off. "Block AI bots" can stay on — it only blocks AI training crawlers, not Googlebot.
- Wait and resubmit — sometimes Cloudflare issues a browser challenge on the first request that Googlebot can't pass. Resubmitting after a few minutes often resolves it.
- Don't panic — it's common for one URL format to fail while the other succeeds (e.g.
http://fails buthttps://works). Give it a few hours before retrying the failed one. Google will often resolve it on its own during the next crawl cycle.
Don't have a sitemap?
If your website doesn't have a sitemap.xml file yet, you'll need to create one before you can submit it here. Contact us for help — this is included in our Done For You setup package.
Step 5
Request indexing
For faster indexing, manually request Google to crawl your key pages. This is especially useful for new sites.
- Go to URL Inspection in the left sidebar
- Enter your homepage URL, e.g.
https://[yourdomain.com]/ - Click Request Indexing
- Repeat for each page on your site (e.g.
https://[yourdomain.com]/tools.html)
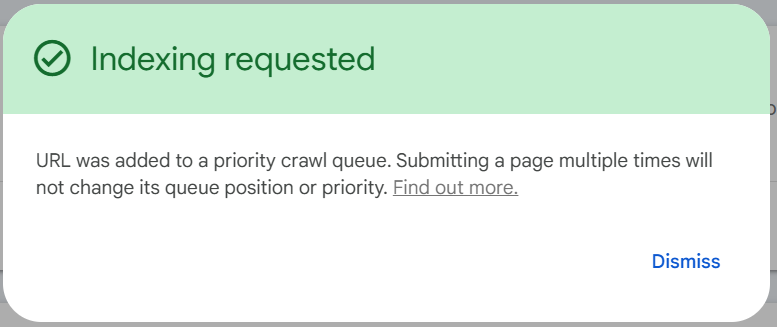
Once successful, you'll see a confirmation like this:
Timeline
Google typically indexes new pages within 1-7 days after requesting. Pages with structured data (like yours) tend to be indexed faster.
Step 6
Monitor performance
After a few days, start checking your Search Console dashboard regularly to understand how people find your site.
- Performance tab — see which search queries bring visitors and click-through rates
- Coverage tab — check all pages are indexed without errors
- Enhancements tab — verify structured data (Product, Organization, SoftwareApplication schemas) is detected
- Core Web Vitals tab — check page speed scores and loading performance
Reference
What's already set up on your site
The following SEO elements have been added to your HTML pages. No further action needed on these.
| Element | index.html | tools.html |
|---|---|---|
| Title tag | Done | Done |
| Meta description | Done | Done |
| Canonical URL | Done | Done |
| Robots meta | Done | Done |
| Open Graph tags | Done | Done |
| Twitter Card tags | Done | Done |
| JSON-LD Schema | Organization + Product | ItemList + SoftwareApplication |
| H1 heading | Done | Done |
| Image alt text | Done | Done |
| robots.txt | Site-level | |
| sitemap.xml | Site-level | |
Optional
Bing Webmaster Tools
Bing powers search results on Bing, Yahoo, DuckDuckGo, and Ecosia. Adding your site takes under 2 minutes.
- Go to bing.com/webmasters
- Sign in and click Add your site
- Choose "Import from Google Search Console" for instant setup
- Submit the same sitemap:
sitemap.xml
Optional
Google Analytics (GA4)
Search Console shows how people find your site. Google Analytics shows what they do once they arrive — page views, time on site, conversions.
- Go to analytics.google.com
- Create a new GA4 property for
elevaition.solutions - Get your Measurement ID (format:
G-XXXXXXXXXX) - Add this script to the
<head>of bothindex.htmlandtools.html:
- Replace
G-XXXXXXXXXXwith your actual Measurement ID - Commit and push to GitHub
Next Steps
Keep improving your SEO
- Create a social sharing image — a custom 1200x630px image with your headline text will look better when shared on LinkedIn and Twitter (currently using the logo)
- Build backlinks — submit your site to relevant directories, share on LinkedIn, write guest posts on industry blogs
- Monitor weekly — check Search Console for new queries, indexing issues, and Core Web Vitals
- Add more pages — blog posts, case studies, and landing pages improve your keyword coverage and authority
- Share on social — every LinkedIn post linking to your site builds domain authority and drives referral traffic